Display of devices page
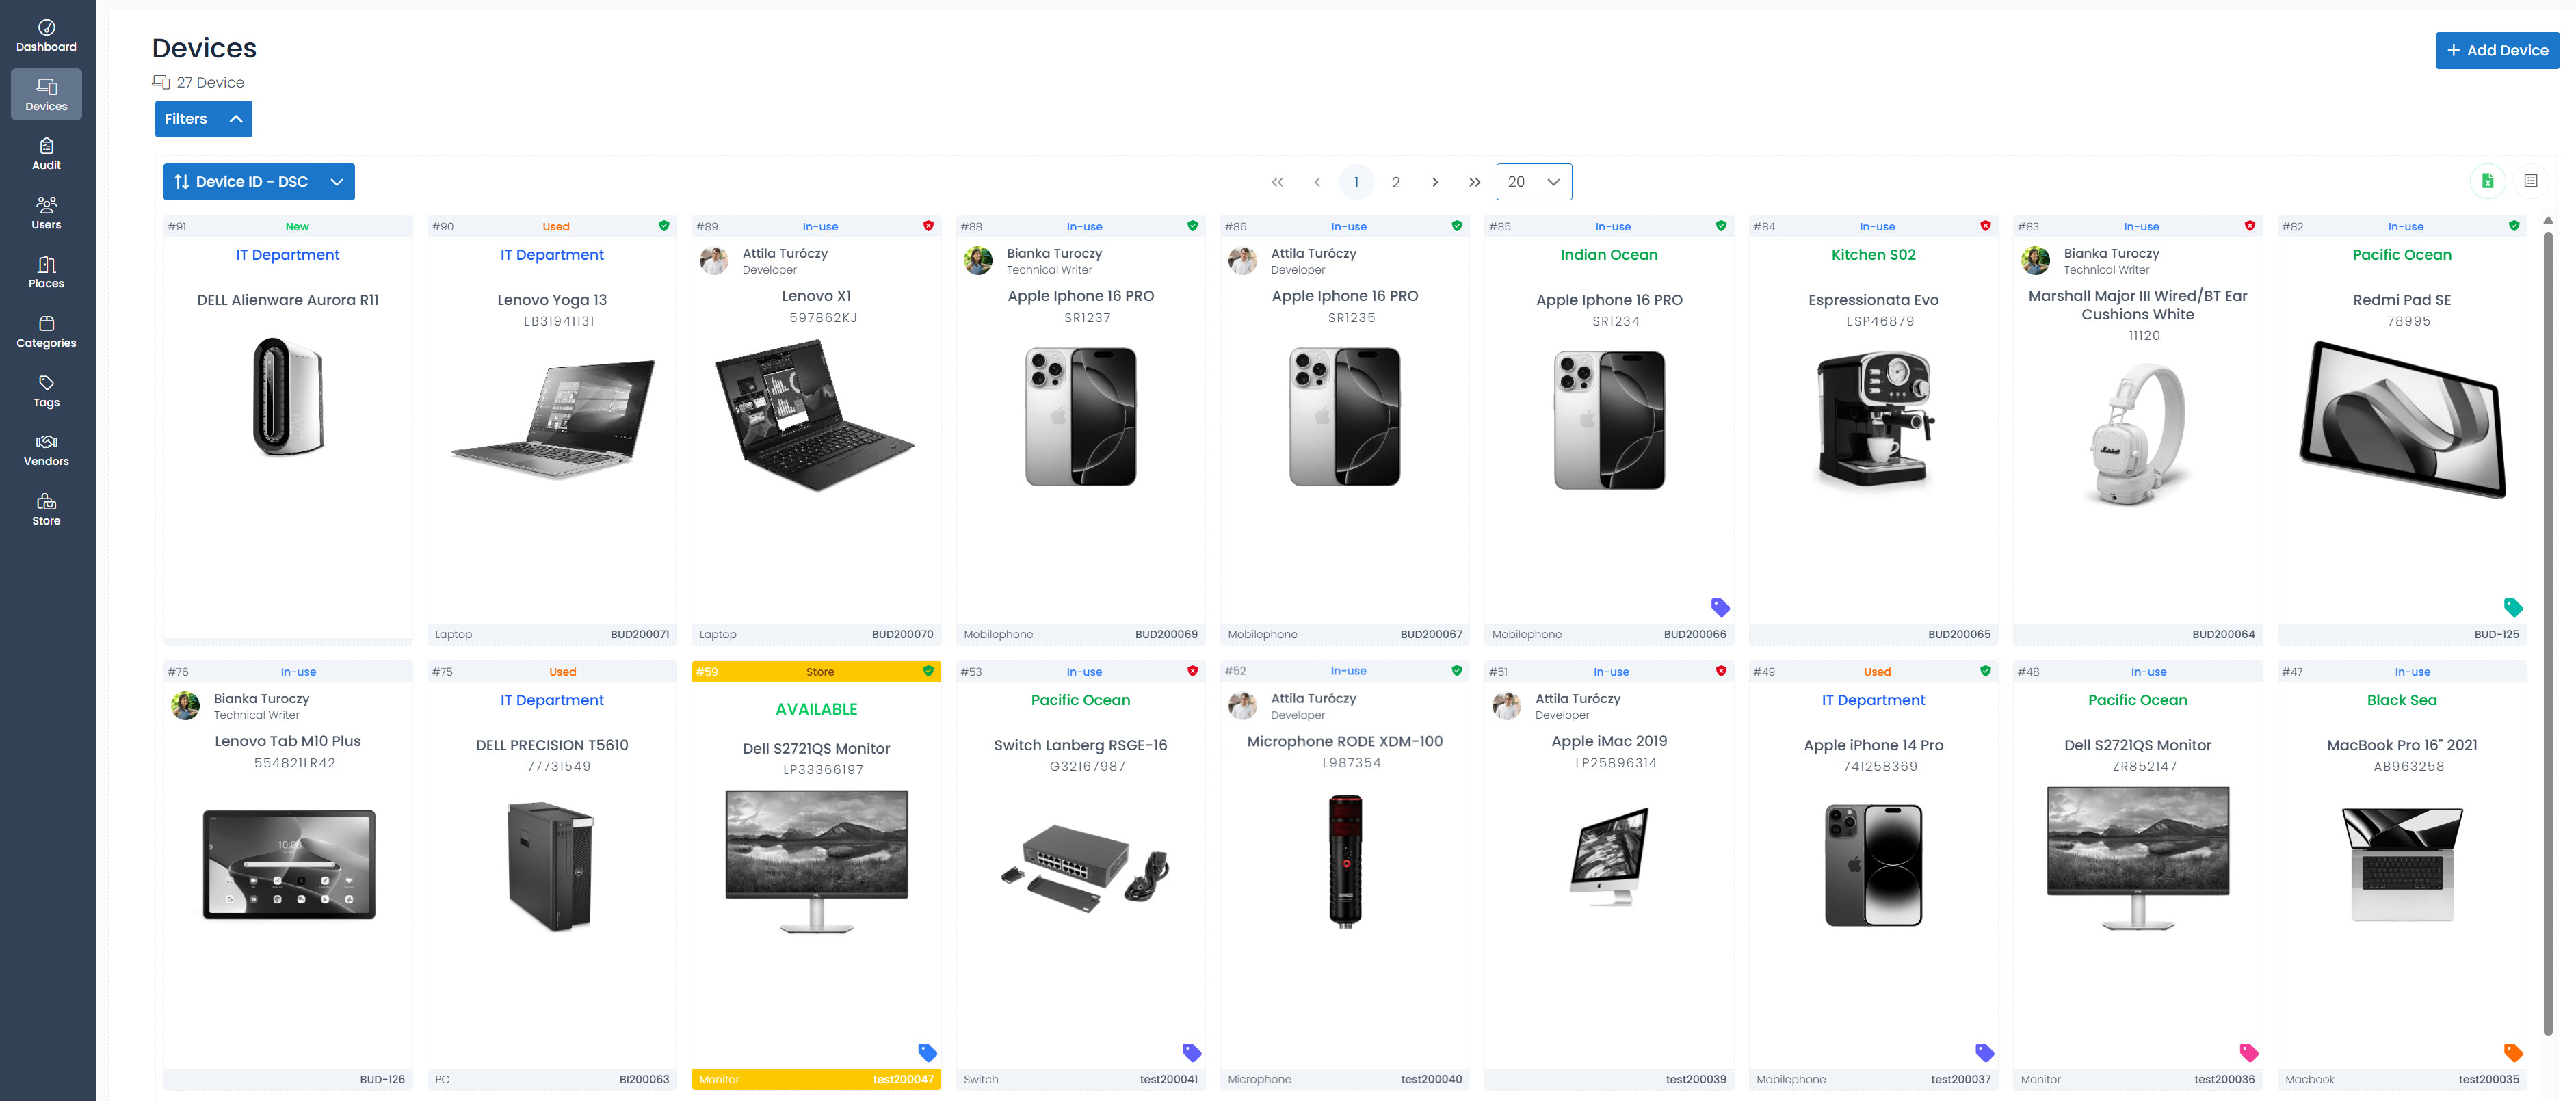
On the Devices page, you can view all the devices registered by the administrator within the company.
At the top left of the page, you can see the total number of company devices.
Utilize filters to locate specific devices.
You have the opportunity to customize the order of the displayed devices.
In the center of the screen, select the number of devices you want to view per page.
On the right side with the blue Add device button you can add more new devices.
Download a list of your devices as an Excel file using the green icon.
Next to the green Excel icon, find another balck icon that allows you to switch between Details view with tiles and Listed view**.
Details view with tiles
On the device tile, find the following information:
At the top left corner of the tile, you can see the ID: Each device is assigned a unique ID number upon creation.
In the top middle of the tile, the status of the device is displayed.
At the top right corner of the tile, green or red shield icons indicate the warranty status of the device. It is displayed only in the case where you fill in the warranty data when adding a new device.
The assigned person's name and title are listed.
In the center of the tile, you can view the name and serial number of the device.
Below the device name, an image selected during the device addition is displayed.
At the bottom left corner of the tile, check the selected device category.
At the bottom right corner of the tile, view the barcode generated for the device by the application.
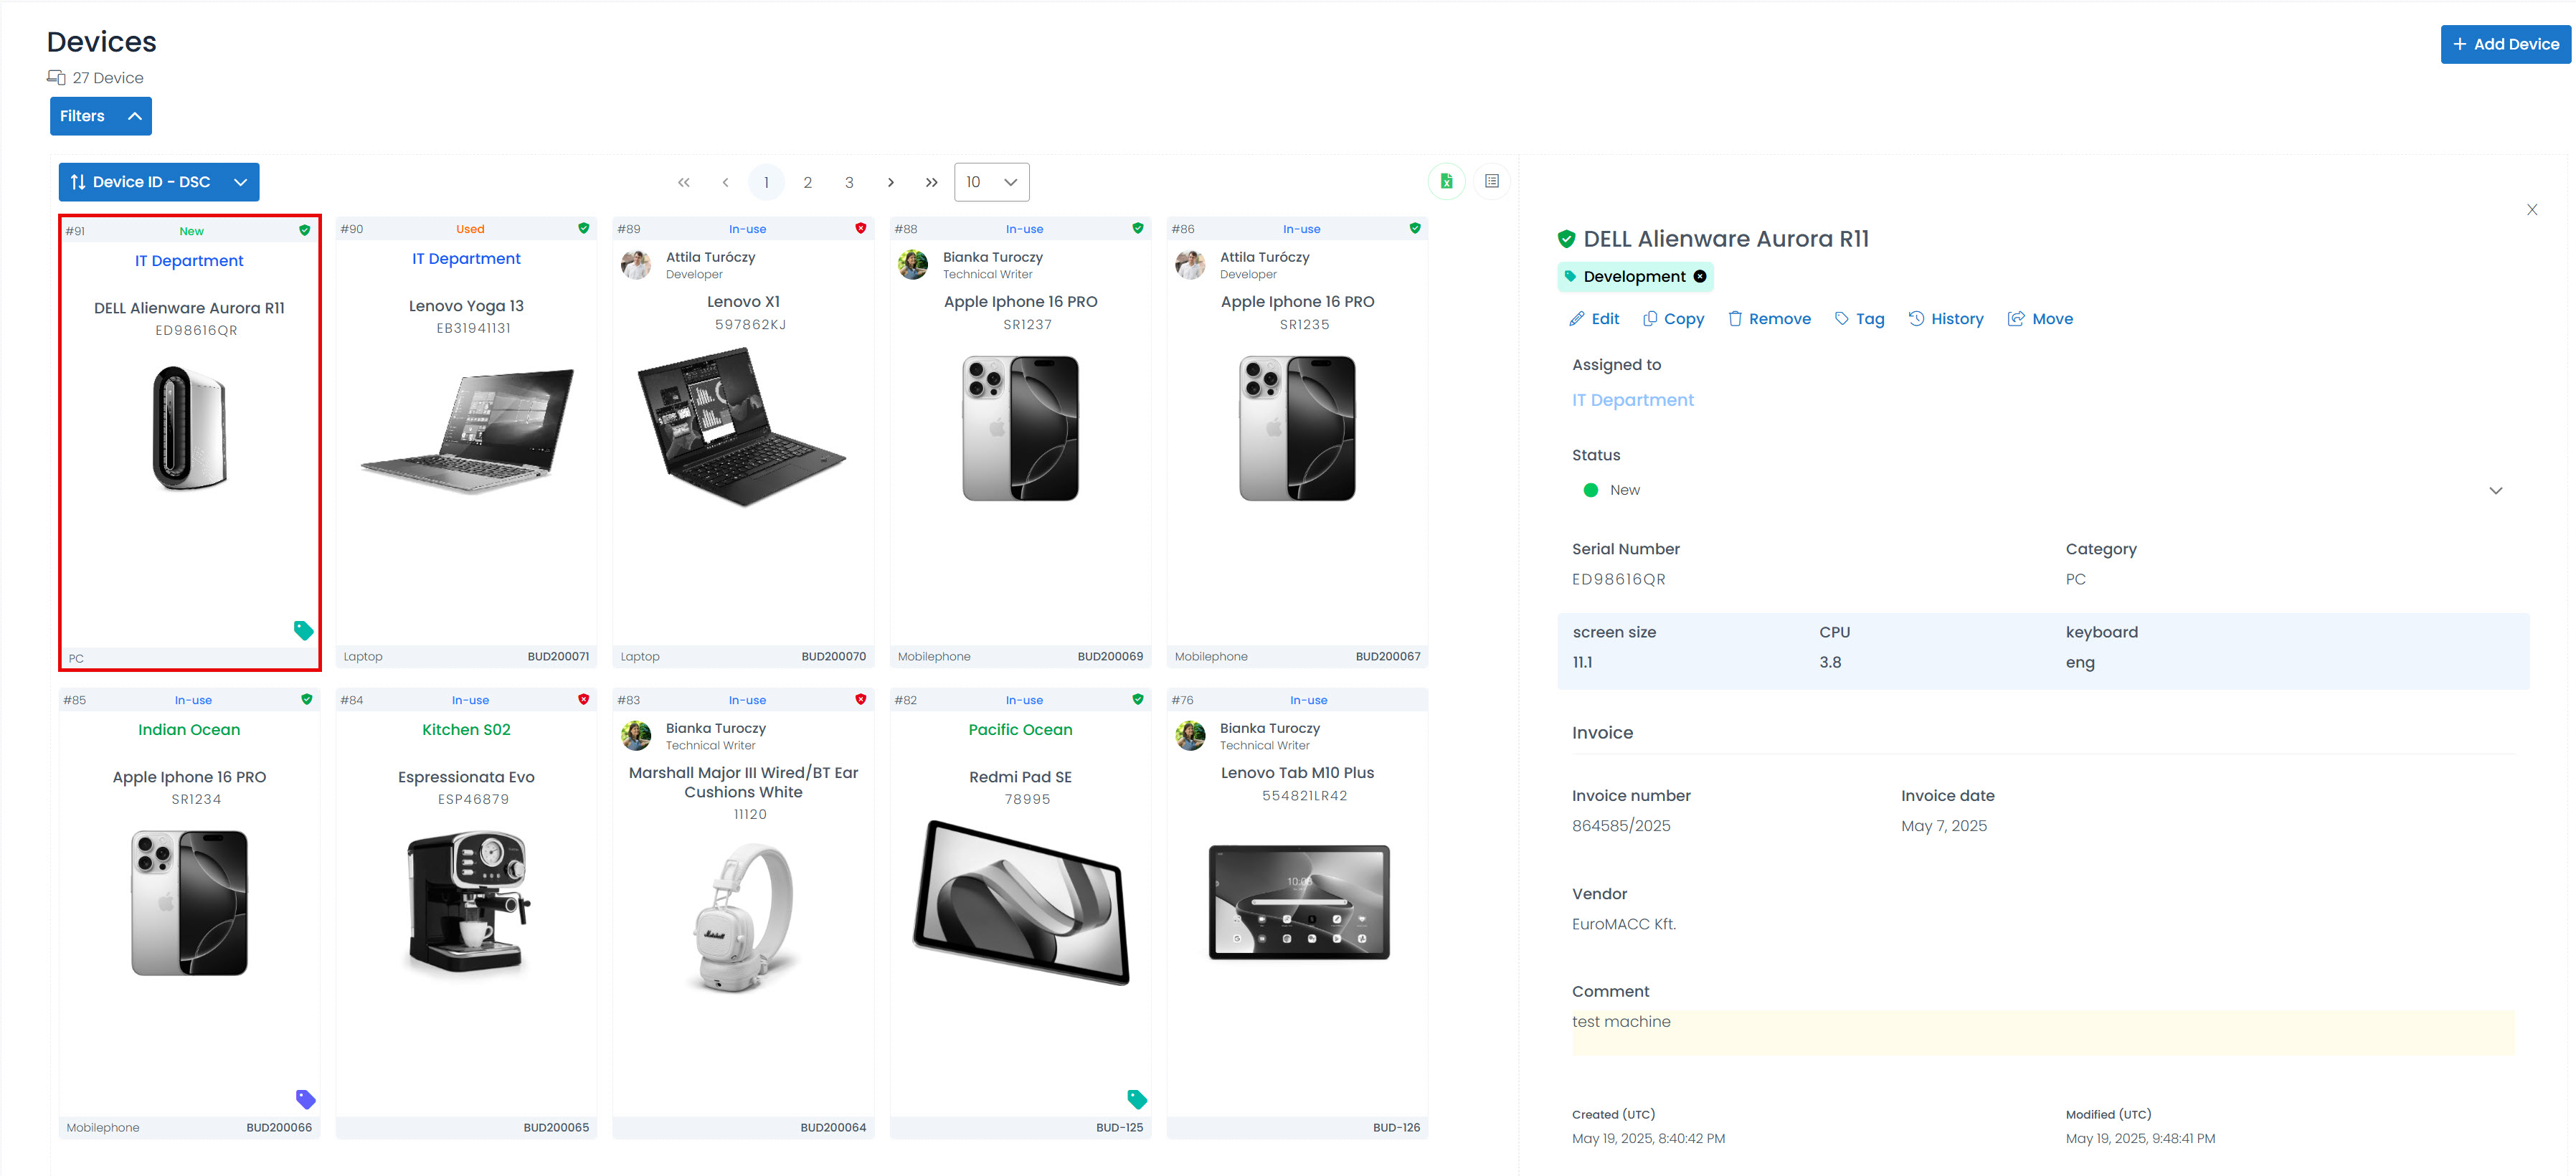
When you click on a tile, a right-side panel appears, allowing you to check all information about the device and take actions.


Listed view
When the Listed View option is selected, a table header and a list of devices are displayed.
The table header includes the ID, device name, category, assign, serial number, invoice number, status and tag.
In the list, before the name of each device, you may see green or red shield icons indicating the warranty status of the device. It is displayed only in the case where you fill in the warranty data when adding a new device.
Clicking on a device in the list triggers a right-side panel, allowing you to view all device information and perform actions.

Information right side block
When you click on a device (either in tiles or listed view), all information added by administrators about the selected device appears on the right side of the screen and you can take actions also here.


Device name is at the top of the right-side block.
Next to the device name, you can check the warranty with shield icon. Hovering over the icon reveals whether the warranty status is active (green) or expired (red).
Below the device name, the tag of the device is displayed.
Below the tag, find a menu with options:
Edit: Click on this option to edit detailed information about the selected device.
Copy: Click on this option to open a smaller window where you can copy the selected New device with added new serial number(s).
tipThis is recommended when creating multiple devices with similar data, facilitating the quick creation of similar devices.
infoCopy function is only possible for devices with New status.
Remove: This function permanently deletes the selected device.
Tag: Add a tag to the device from those you have created previously, or select None to remove the existing tag from the device.
History: Open a new window to view the history of the selected device.
Move: You can move the device to another tenant by selecting from the drop-down menu, which contains the previously created tenants. The device disappears from the current tenant and appears in the selected tenant.
infoWhen a device is initially assigned to a user and later moved to another tenant, the user remains the same.
When a device is initially assigned to a location and later moved to another tenant, it is allocated to the IT department of the new tenant
tipTo learn more about what a tenant is, click here.
Further down, in the assignment section, you can assign the device by entering a user name or place. Alternatively, you can click on Assign to IT.
The status of the device is listed.
Serial number, category, and if applicable, the category metadata (displayed in a blue background when the category is present) are shown.
Invoice details, including invoice number, price, invoice date, vendor, and invoice data (company-specific data), can be checked. Upload an invoice document when adding the device, and it becomes available for review.
The comment section with a yellow background, allows you to create or view any comments about the device.
At the bottom of the details block, you can check the creation and modification dates of the device.
The application-generated barcode is located for the device in the bottom right corner.
You can close the information right side panel with the X button located in the top right corner of the page.